Use Of Document Library In Ms SharePoint
January 8, 2021 2022-05-26 13:47Use Of Document Library In Ms SharePoint
Use Of Document Library In Ms SharePoint
In this session, you will be taught more about the SharePoint document library view. We are going through some of its other functions. You can add files to this document library using the drag and drop feature. So I’ll demonstrate that to you now.
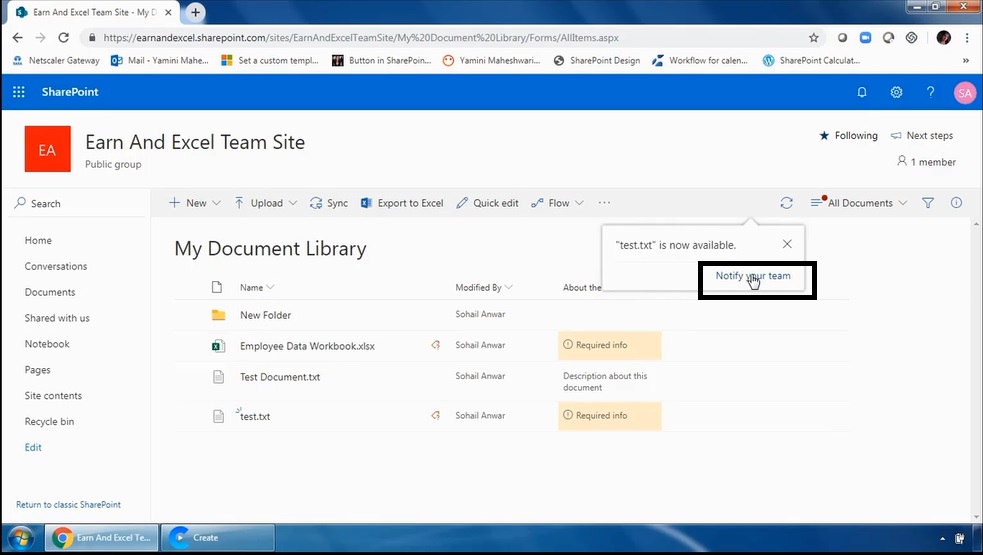
So, I have these text files to upload one of them using the drag and drop features. Drag this one right to the SharePoint library area, release, and show that it’s uploading the document, and the document is available now.

Once you upload a file to SharePoint, it gives you the option to notify your team that a new file has been uploaded. If there are members of your team or other persons you want to alert to that this file is now available in SharePoint, you can enter their name or email address. You can add that person, and you can add multiple people if you wish.
You click notify, and it’ll give them a notification that the file is now available on the SharePoint Site. This file has now been uploaded. You can see drag and drop feature works just fine.

Fill the Required Info
Same as uploading a document, you can see in this column about the document column that there is required info. If you want, you can click on the file and modify the description from the file properties. Whenever you select a file and click this ellipsis here, it will bring up the context menu, and when you click on more, you will see the properties option.
You can enter or change any details about the properties of the documents that are necessary. You can see there’s a red asterisk here because it’s a required field name. It’s the official default name of the document.

However, you can change the title of a document in the SharePoint site to whatever you wish it to be, and any changes made here auto-save. You don’t need to specifically click any kind of save Button as you can see the required info alert is gone.
The description we just wrote is here, so one of the main advantages of SharePoint is that it allows groups of people to work on the same document simultaneously. Let’s use this excel file that we uploaded earlier as an example. Another user and I want to update this document at the same time. Now there could be a conflict when I make changes to this file, and another user makes different changes to this file.

Explore Variety of Features in Ms SharePoint
Now, to avoid this conflict, there is a feature in SharePoint called to check out. So, in this more menu, you can see there is an option that says check out. When you click to check out, it will lock the file to the user who’s clicked that option for editing. So, only this user can edit it while it’s checked out.
You can see that small red little icon near the document’s title that lets us know that this document is currently checked out. Suppose another user tries to check out this document or edit this document. In that case, they will be given an alert by SharePoint, which will tell them that another user is currently editing this document, and they should try again later. So, I am going to open this workbook now, I am going to make a few changes to it and save them.


You can see how to check in a document and publish the changes that you’ve made. As you can see here, it is auto-saving my changes. Once it says save, I can safely close this tab, so I’m going to refresh this page, and you can open the document again just to confirm that the changes have been saved.
We can see here the entry we recently added is still there. So, I’m going to close this tab, and I’m going to check this document back in. Now, the other users won’t see any changes you have made to this document unless or until you check it back in checking-in essentially work like publishing. It’s when you make the content available to the other users as well.
Use of SharePoint Document Library View & Check-In & Out Option
Now we are back in this more menu option, and you can see two options here. You’ve got a check-in or discard check out. If you click discard, check out here; all the changes you have made to a document will be undone. The document will revert to how it was before you checked it out.
All changes will be erased. Click check in now. When you click check-in, it will ask you for some comments about what was changed in the document since you checked it out. So, here you can just add some comments regarding those changes. The other users will know what has changed in the document; this is an optional step. If you don’t want to add any changes or any comments, you can just click check-in.


Because we still have a required field about the document field. This document wasn’t successfully checked in. So, when you’re checking in a Document. You need to make sure all the information is filled in the required fields for it to be successful. So, I am going to edit this file’s properties and put in some information about the document. Now, I’m going back to check in the document, and it should check in successfully.
It says check in one item is done, and you can see that the small red icon that was appearing here is now gone. The changes we made to this document will be visible to everyone. That’s how checking in and checking out works in SharePoint. These are some uses of SharePoint Document Library view.


